
TensorFlow tutorial
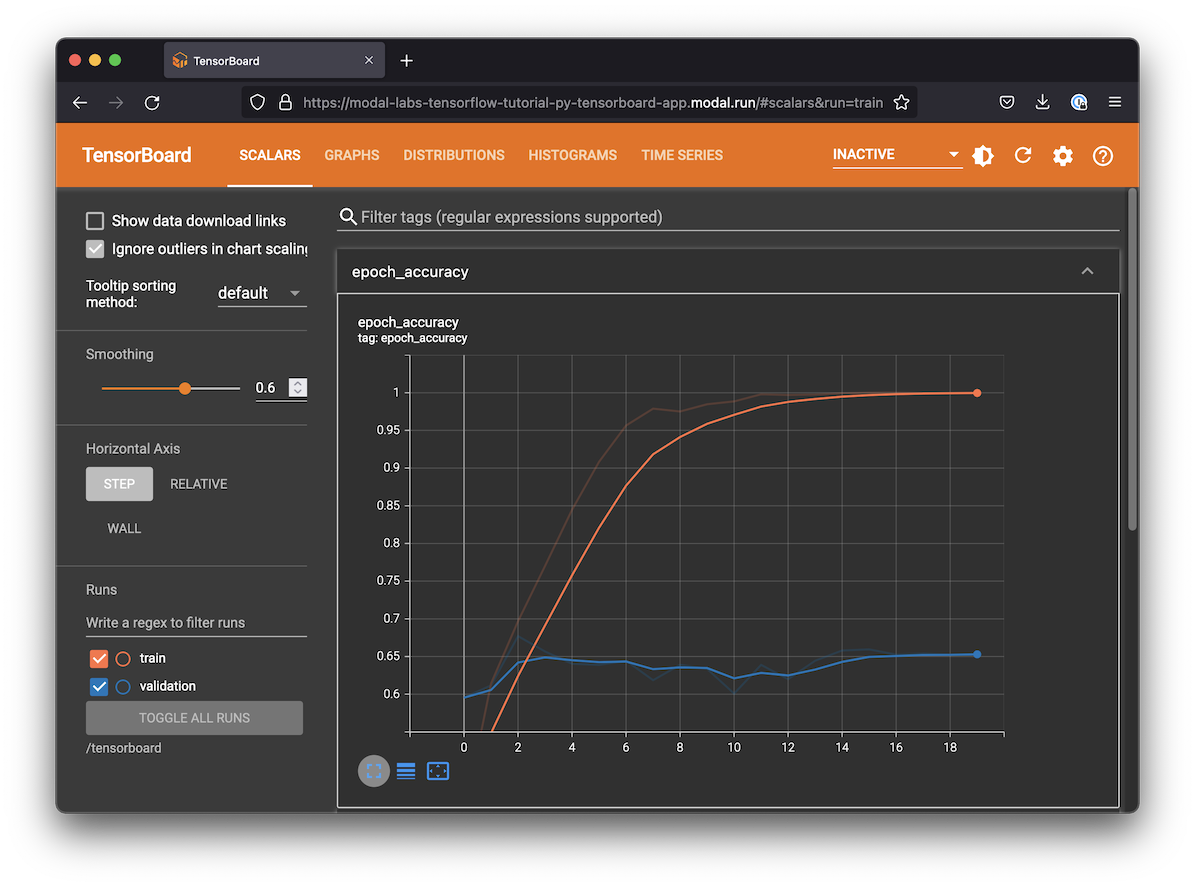
This is essentially a version of the image classification example in the TensorFlow documentation running inside Modal on a GPU. If you run this script, it will also create an TensorBoard URL you can go to to watch the model train and review the results:
Setting up the dependencies
Configuring a system to properly run GPU-accelerated TensorFlow can be challenging.
Luckily, Modal makes it easy to stand on the shoulders of giants and use a pre-built Docker container image from a registry like Docker Hub.
We recommend TensorFlow’s official base Docker container images, which come with tensorflow and its matching CUDA libraries already installed.
If you want to install TensorFlow some other way, check out their docs for options and instructions. GPU-enabled containers on Modal will always have NVIDIA drivers available, but you will need to add higher-level tools like CUDA and cuDNN yourself. See the Modal guide on customizing environments for options we support.
import time

import modal

dockerhub_image = modal.Image.from_registry(
    "tensorflow/tensorflow:2.15.0-gpu",
)

app = modal.App("example-tensorflow-tutorial", image=dockerhub_image)
Logging data to TensorBoard
Training ML models takes time. Just as we need to monitor long-running systems like databases or web servers for issues, we also need to monitor the training process of our ML models. TensorBoard is a tool that comes with TensorFlow that helps you visualize the state of your ML model training. It is packaged as a web server.
We want to run the web server for TensorBoard at the same time as we are training the TensorFlow model. The easiest way to share data between the training function and the web server is by creating a Modal Volume that we can attach to both Functions.
volume = modal.Volume.from_name("tensorflow-tutorial", create_if_missing=True)
LOGDIR = "/tensorboard"
Training function
This is basically the same code as the official example from the TensorFlow docs. A few Modal-specific things are worth pointing out:
We attach the Volume for sharing data with TensorBoard in the
app.functiondecorator.We also annotate this function with
gpu="T4"to make sure it runs on a GPU.We put all the TensorFlow imports inside the function body. This makes it possible to run this example even if you don’t have TensorFlow installed on your local computer — a key benefit of Modal!
You may notice some warnings in the logs about certain CPU performance optimizations (NUMA awareness and AVX/SSE instruction set support) not being available. While these optimizations can be important for some workloads, especially if you are running ML models on a CPU, they are not critical for most cases.
@app.function(volumes={LOGDIR: volume}, gpu="T4", timeout=600)
def train():
    import pathlib

    import tensorflow as tf
    from tensorflow.keras import layers
    from tensorflow.keras.models import Sequential

    # load raw data from storage
    dataset_url = "https://storage.googleapis.com/download.tensorflow.org/example_images/flower_photos.tgz"
    data_dir = tf.keras.utils.get_file(
        "flower_photos.tar", origin=dataset_url, extract=True
    )
    data_dir = pathlib.Path(data_dir).with_suffix("")

    # construct Keras datasets from raw data
    batch_size = 32
    img_height = img_width = 180

    train_ds = tf.keras.utils.image_dataset_from_directory(
        data_dir,
        validation_split=0.2,
        subset="training",
        seed=123,
        image_size=(img_height, img_width),
        batch_size=batch_size,
    )

    val_ds = tf.keras.utils.image_dataset_from_directory(
        data_dir,
        validation_split=0.2,
        subset="validation",
        seed=123,
        image_size=(img_height, img_width),
        batch_size=batch_size,
    )

    class_names = train_ds.class_names
    train_ds = (
        train_ds.cache().shuffle(1000).prefetch(buffer_size=tf.data.AUTOTUNE)  # type: ignore
    )
    val_ds = val_ds.cache().prefetch(buffer_size=tf.data.AUTOTUNE)  # type: ignore
    num_classes = len(class_names)

    model = Sequential(
        [
            layers.Rescaling(1.0 / 255, input_shape=(img_height, img_width, 3)),
            layers.Conv2D(16, 3, padding="same", activation="relu"),
            layers.MaxPooling2D(),
            layers.Conv2D(32, 3, padding="same", activation="relu"),
            layers.MaxPooling2D(),
            layers.Conv2D(64, 3, padding="same", activation="relu"),
            layers.MaxPooling2D(),
            layers.Flatten(),
            layers.Dense(128, activation="relu"),
            layers.Dense(num_classes),
        ]
    )

    model.compile(
        optimizer="adam",
        loss=tf.keras.losses.SparseCategoricalCrossentropy(from_logits=True),
        metrics=["accuracy"],
    )

    model.summary()

    tensorboard_callback = tf.keras.callbacks.TensorBoard(
        log_dir=LOGDIR,
        histogram_freq=1,
    )

    model.fit(
        train_ds,
        validation_data=val_ds,
        epochs=20,
        callbacks=[tensorboard_callback],
    )
Running TensorBoard
TensorBoard is compatible with a Python web server standard called WSGI, the same standard used by Flask. Modal speaks WSGI too, so it’s straightforward to run TensorBoard in a Modal app.
We will attach the same Volume that we attached to our training function so that TensorBoard can read the logs. For this to work with Modal, we will first create some WSGI Middleware to check the Modal Volume for updates any time the page is reloaded.
class VolumeMiddleware:
    def __init__(self, app):
        self.app = app

    def __call__(self, environ, start_response):
        if (route := environ.get("PATH_INFO")) in ["/", "/modal-volume-reload"]:
            try:
                volume.reload()
            except Exception as e:
                print("Exception while re-loading traces: ", e)
            if route == "/modal-volume-reload":
                environ["PATH_INFO"] = "/"  # redirect
        return self.app(environ, start_response)
The WSGI app isn’t exposed directly through the TensorBoard library, but we can build it the same way it’s built internally — see the TensorBoard source code for details.
Note that the TensorBoard server runs in a different container. The server does not need GPU support. Note that this server will be exposed to the public internet!
@app.function(
    volumes={LOGDIR: volume},
    max_containers=1,  # single replica
    scaledown_window=5 * 60,  # five minute idle time
)
@modal.concurrent(max_inputs=100)  # 100 concurrent request threads
@modal.wsgi_app()
def tensorboard_app():
    import tensorboard

    board = tensorboard.program.TensorBoard()
    board.configure(logdir=LOGDIR)
    (data_provider, deprecated_multiplexer) = board._make_data_provider()
    wsgi_app = tensorboard.backend.application.TensorBoardWSGIApp(
        board.flags,
        board.plugin_loaders,
        data_provider,
        board.assets_zip_provider,
        deprecated_multiplexer,
        experimental_middlewares=[VolumeMiddleware],
    )
    return wsgi_app
Local entrypoint code
Let’s kick everything off. Everything runs in an ephemeral “app” that gets destroyed once it’s done. In order to keep the TensorBoard web server running, we sleep in an infinite loop until the user hits ctrl-c.
The script will take a few minutes to run, although each epoch is quite fast since it runs on a GPU. The first time you run it, it might have to build the image, which can take an additional few minutes.
@app.local_entrypoint()
def main(just_run: bool = False):
    train.remote()
    if not just_run:
        print(
            "Training is done, but the app is still running TensorBoard until you hit ctrl-c."
        )
        try:
            while True:
                time.sleep(1)
        except KeyboardInterrupt:
            print("Terminating app")